sales06@switek.biz

+86 186 5927 5869

Shopping

Subscrib to Us
sales06@switek.biz
+86 186 5927 5869
Shopping
Subscrib to Us

Keywords:Panasonic A6 Servo Installation Instruction, Panasonic A6 Driver, Panasonic A6 Series Servo Motor Manual
The correct setup of the parameter and mode of the Panasonic A6 series of servo will ensure the proper working of the Panasonic A6 series of motor and the stability of your machineries and automation system.
| Parameter No. | Title | Range | Default | Unit | Turning on of power supply | Related Control Mode | Detail page | ||||||
|---|---|---|---|---|---|---|---|---|---|---|---|---|---|
| Class | No. | A,B-frame | C-frame | D,E,F-frame | P | S | T | F | |||||
| 3 | 00 | Speed setup, Internal/External switching | 0 to 3 | 0 | — | ○ | 4-31 | ||||||
| 3 | 01 | Speed command rotational direction selection | 0 to 1 | 0 | — | ○ | |||||||
| 3 | 02 | Input gain of speed command | 10 to 2000 | 500 | (r/min)/V | ○ | ○ | 4-32 | |||||
| 3 | 03 | Reversal of speed command input | 0 to 1 | 1 | — | ○ | |||||||
| 3 | 04 | 1st speed of speed setup | -20000 to 20000 | 0 | r/min | ○ | 4-33 | ||||||
| 3 | 05 | 2nd speed of speed setup | -20000 to 20000 | 0 | r/min | ○ | |||||||
| 3 | 06 | 3rd speed of speed setup | -20000 to 20000 | 0 | r/min | ○ | |||||||
| 3 | 07 | 4th speed of speed setup | -20000 to 20000 | 0 | r/min | ○ | |||||||
| 3 | 08 | 5th speed of speed setup | -20000 to 20000 | 0 | r/min | ○ | |||||||
| 3 | 09 | 6th speed of speed setup | -20000 to 20000 | 0 | r/min | ○ | |||||||
| 3 | 10 | 7th speed of speed setup | -20000 to 20000 | 0 | r/min | ○ | |||||||
| 3 | 11 | 8th speed of speed setup | -20000 to 20000 | 0 | r/min | ○ | |||||||
| 3 | 12 | Aacceleration time setup | 0 to 10000 | 0 | ms/(1000 r/min) | ○ | |||||||
| 3 | 13 | Deceleration time setup | 0 to 10000 | 0 | ms/(1000 r/min) | ○ | |||||||
| 3 | 14 | Sigmoid acceleration/deceleration time setup | 0 to 1000 | 0 | ms | ○ | 4-34 | ||||||
| 3 | 15 | Speed zero-clamp function selection | 0 to 3 | 0 | r/min | ○ | |||||||
| 3 | 16 | Speed zero clamp level | 10 to 20000 | 30 | r/min | ○ | ○ | ||||||
| 3 | 17 | Selection of torque command | 0 to 2 | 0 | — | ○ | 4-35 | ||||||
| 3 | 18 | Torque command direction selection | 0 to 1 | 0 | — | ○ | |||||||
| 3 | 19 | Input gain of torque command | 10 to 1000 | 30 | 0.1V/100%* | ○ | |||||||
| 3 | 20 | Input reversal of torque command | 0 to 1 | 0 | — | ○ | 4-36 | ||||||
| 3 | 21 | Speed limit value 1 | 0 to 20000 | 0 | r/min | ○ | |||||||
| 3 | 22 | Speed limit value 2 | 0 to 20000 | 0 | r/min | ○ | |||||||
| 3 | 23 | External scale selection | 0 to 6 | 0 | — | ○ | ○ | 4-37 | |||||
| 3 | 24 | Numberator of external scale division | 0 to 223 | 0 | — | ○ | ○ | ||||||
| 3 | 25 | Denominator of external scale division | 1 to 223 | 10000 | — | ○ | ○ | ||||||
| 3 | 26 | Reversal of direction of external scale | 0 to 3 | 0 | — | ○ | ○ | 4-38 | |||||
| 3 | 27 | External scale Z phase disconnection detection disable | 0 to 1 | 0 | — | ○ | ○ | ||||||
| 3 | 28 | Hybrid deviation excess setup | 1 to 227 | 16000 | Command unit | ○ | ○ | ||||||
| 3 | 29 | Hybrid deviation clear setup | 0 to 100 | 0 | Revolution | ○ | ○ | ||||||
Caution → Tye symbol "*" attached to "Unit". indicates that the digits of setting unit will change if the parameter is set by using the setup support software PANATERM.
Note → Parameter describes of this page is P.4-6 to P.4-85.

SW6710D-20
Unit: mm
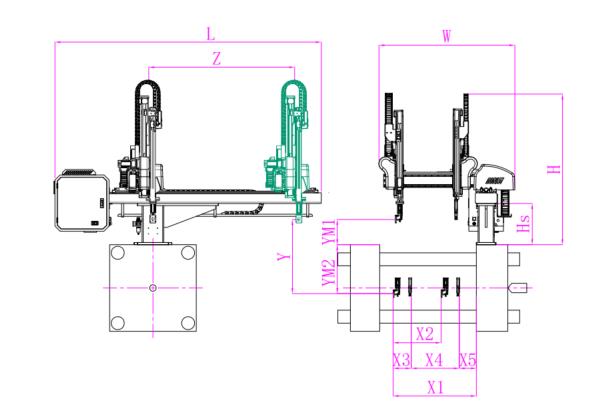
| X1 | X2 | X3 | X4 | Y | YM1 | YM2 | Z | L | W | H | Payload | 1025 | 1025 | 250 | 590 | 1000 | 475 | 525 | 1750 | 2780 | 1610 | 1930 | 8kg |
|---|
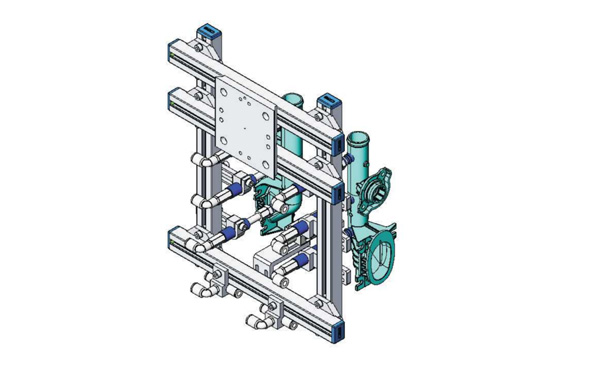
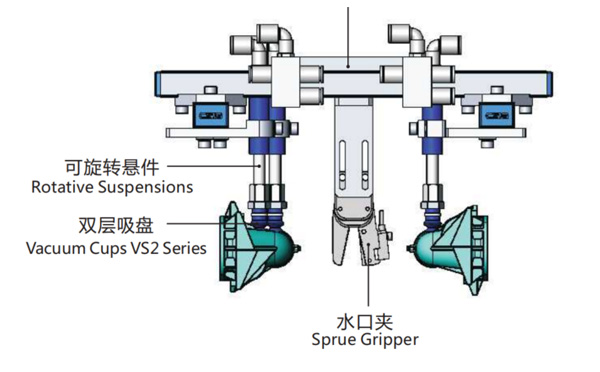
EOAT Assembly Demonstration -- Two Cavities Parts Picking EOAT with Runner Gripping
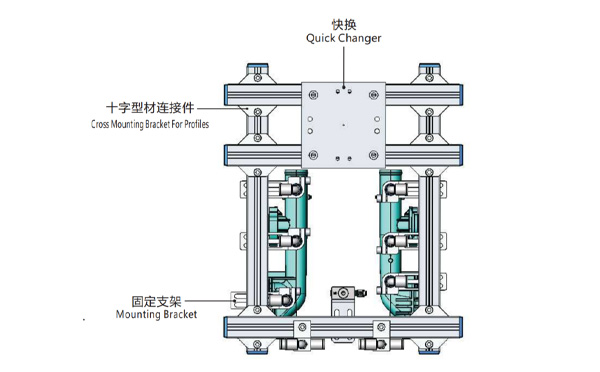
Product Descriptions
Bom List
| Product Name | PN # | Model | Quantity |
|---|---|---|---|
| Quick Changer | 7.Y00175 | QCS-G100 | 1 |
| Sprue Gripper | 8.Y00050 | GR12-12CP | 1 |
| Plugs for Profile | 4.Y00069 | PEP2518 | 10 |
| Cross Mounting Bracket for Profiles | 7.Y00194 | SMBA-2525T | 6 |
| Extruded Profile | 4.Y00455 | PEP2518-1000 | 2 |
| Vacuum Cups VS2 Series | 1.Y03085 | VS2-SA11 | 6 |
| Vacuum Cup Fitting | 7.Y00703 | VM-02-G18 | 6 |
| Rotative Suspensions | 8.Y00061 | VFR1421-G18 | 6 |
| Mounting Bracket | 7.Y00200 | SMBE1-1440T | 6 |
| Connector | 1.Y02510 | APF-M5 | 2 |
| Side Manifold Block | 7.Y00157 | SMB-06M5 | 2 |
| L-Type Threaded HOse Fitting | 1.Y02722 | APL6-01 | 8 |
| Straight Threaded Hose Fitting | 1.Y02725 | APC6-01 | 6 |
What's the advantage of a double arms robot top entry IML system for lids?
IML lids is now a business of billions of US dollar around the world especially as the package of dairy products. But as an easiest IML products to produce, IML lids is one of the most price sensitive products in the market. A smaller budget in facility investment and easier operating will no doubt help the IML lids producer to reduce their production and will be able to react faster to the market change.
For IML lids for small and medium size containers to be produced in injection molding machine around 350T, the cost of a double arms top entry IML system would be about one 2/3 against a side entry IML robot with similiar productivity. And since the robot is to be installed to the top of the injection molding machine, it'll occupy less floor space and maximize the the floor occupation of your working place. And as a top entry IML system it'll provide more flexibility to have the parts either dropped to the operator side or the non-operator side.