switek email

sales06@switek.biz

switek whatsapp

+86 186 5927 5869

Shopping

Subscrib to Us

.
SWITEK IML Robot Instruction -- SigmaTek -- Program Monitor

High Speed Siden Entry IML Robot SW833-S6

SWITEK IML Robot Instruction -- SigmaTek -- Program Monitor

Abstract

With the control system developed by the Austria automatic company SIGMATEK GmbH & Co KG, SWITEK high speed side entry IML robot is providing a more efficient and outstanding performance for your quality bulk production of the IML Yogurt Cups.

1.3 Function Screen

1.3.7 Vacuum Config

Click Program Monitor button into current page, as the picture below 1.3.7;
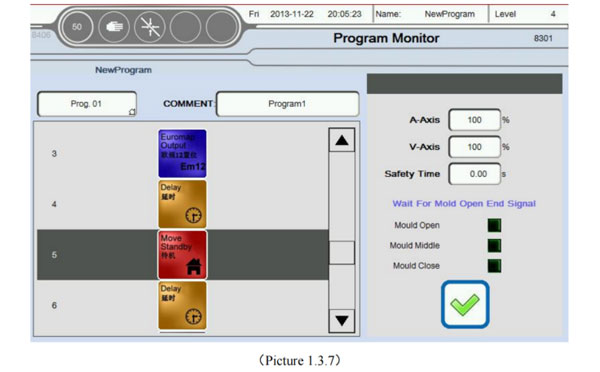
iml robot control system

When robot run automatically, label will automatically follow the instruction to the current action. And with "Dark gray" highlighted in color. At the same time on the right shows the specific content of the current instruction.

1.3.8 Axis Assignment

Click Axis Assignment button into current page. as the picture below 1.3.8;
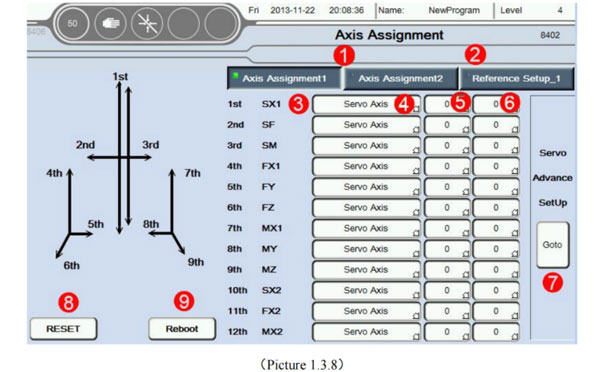
iml robot control system
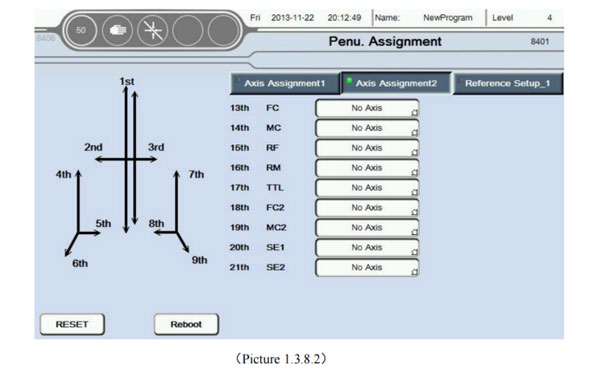
  1. Axis Assignment: (Click Axis Assignment 2 into Penu. axis choose, as the picture below 1.3.8.2);
    iml robot control system
  2. Home setup: Set axis to reference point of the relevant settings;
  3. The current name of axis: Can be based on rename the axis after click on the name of the axis;
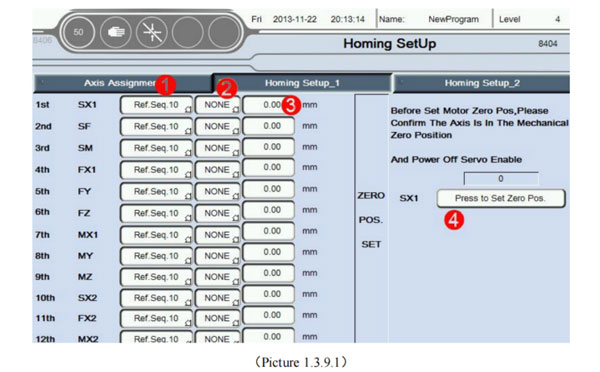
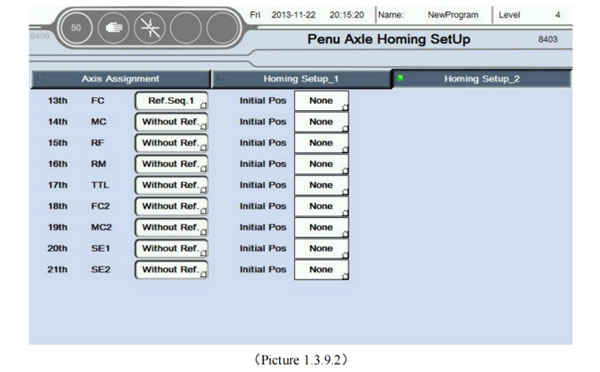
  4. Set axis type: Can choose servo axis, pneu. axis or no choose (do not use this axis; Click on the reference point setting 1, into the reference point setting 1, as the picture below 1.3.9.1; Click on the reference point setting 2, into the reference point setting 2 as the picture below 1.3.9.2;)
    iml robot control system
    1. Set reference point sequence; In total, can be set level 10 reference point sequence. When reference point. Axis in order from small order to big order movement (To run the first order 1, second 2 ...... last 10);
    2. Choose the reference point: Can choose no choose or the reference point, if choosing a reference point. Only when in the corresponding of the axis induction to the point of the reference signal, can be zero. Otherwise the alarm to zero does not meet the conditions. On the other hand, the axis to zero without being limited by the reference point;
    3. Set each axis zero offset: after all the axis to zero. If exist offset with ideal position, the offset position can be set to the ideal position. Offset of the Servo axis unit is mm. The position offset of pneumatic axis have three options; No, the maximum and minimum values;
    4. Click the button to set the current point is zero.
      Attention:
      1. Please make sure the axis in the mechanical zero point position, and make sure the motor enable has been closed, before set the mechanical point;
      2. Mechanical zero setting is only applicable to absolute value of motor of use the Sigmatek driver (MDD/SDD);
      3. The condition of zero: Mould outside signal + Mould complete signal + The reference zero signal (If the conditions are selected as the reference point + Currently no alarm). Otherwise the alarm return does not meet the conditions;
        iml robot control system
        1. Set type of return: The same as upper of zero sequence Settings;
        2. The initial position is set: The same as upper of zero offset Settings;


Best Buy Robotic Arm for Injection Molding Machine
injection robot

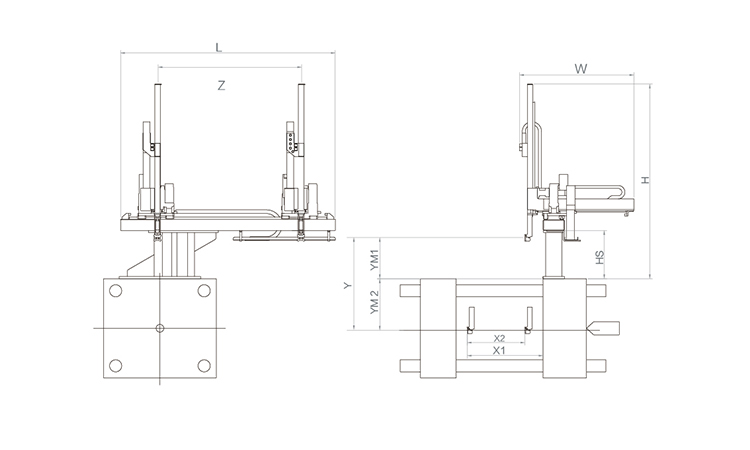
SW7730DS

injection robot

Unit: mm

X1 X2 X3 X4 Y YM1 YM2 Z L W H Payload
2250 1720 0 0 3000 780 2220 4000 5050 3005 3440 75kg

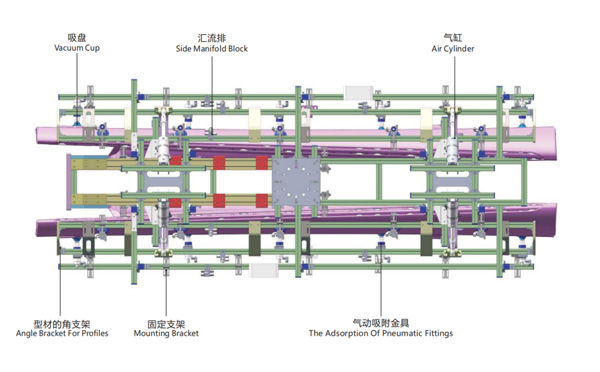
The Application of End of Robotic Arm Tooling

EOAT Assembly Demonstration -- One Cavity Car Threshold Strip Picking EOAT
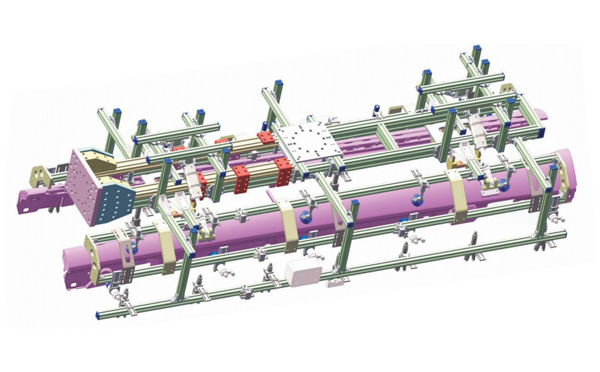
One Cavity Car Threshold Strip Picking EOAT
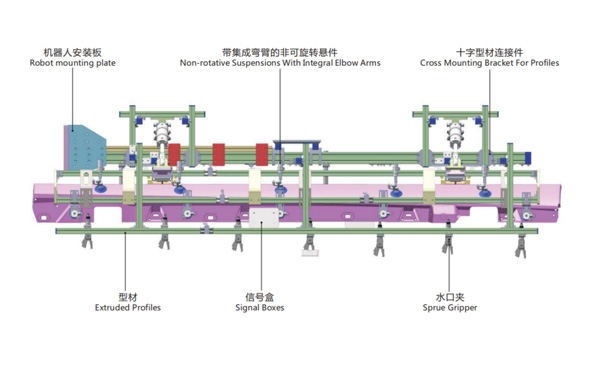
Product Descriptions


Q & A About Robotic Arms and Injection Automation

YIZUMI P350 or P380K3, which one would be a better choice for your IML project?

P350 is a high speed injection molding machine designed for thin-wall containers while P380K3 is the third generation of high speed injection molding machine by YIZUMI designed for thin-wall containers. With 30 Tons more in clamping force, does it mean that P380K3 will compatible to the molds designed according to the parameters of P350?

In one just finished IML project we encountered something embrassing. There's one mold designed according to the parameter of YIZUMI P350, and we have a P380K3 in our system testing workshop, but when the mold received we find that the mold thinkness exceeded the max mold thickness of the P380K3. After double check the parameters of both the injection molding machine we found that Mold thickness allowed for P350 is 300~750mm while the mold thickness for P380K3 is only 250~650mm. And the Max Daylight of P380K3 is 160mm less than P350.

Then how to choose between, which one would be a better choice for your IML project? It would be depends on the size of the parts of which you're producing. For smaller container 30 Tons more clamping force with 160mm less max daylight means that the injection molding machine will have a less mold Open/Close time and result in a higher productivity while for larger size containers P350 will allow you to install a thicker mold, it would be more friendly to an IML project of deep cavity containers.

For more insights of the cutting edge IML technology please feel free to contact Adams from SWITEK, your personal consultant of IML Solutions.


Email: sales06@switek.biz

WhatsApp

WeChat