sales06@switek.biz

+86 186 5927 5869

Shopping

Subscrib to Us
sales06@switek.biz
+86 186 5927 5869
Shopping
Subscrib to Us

In this chapter you'll have the detailed wiring diagram of a SWITEK 3/5 axis servo robotic arm for injection molding machine which include the wiring of the I/O, the main board to the panel, the main board to servo. The purpose of this chapter is for you to have an idea about the control of the SWITEK 3/5 axis servo robotic arm.
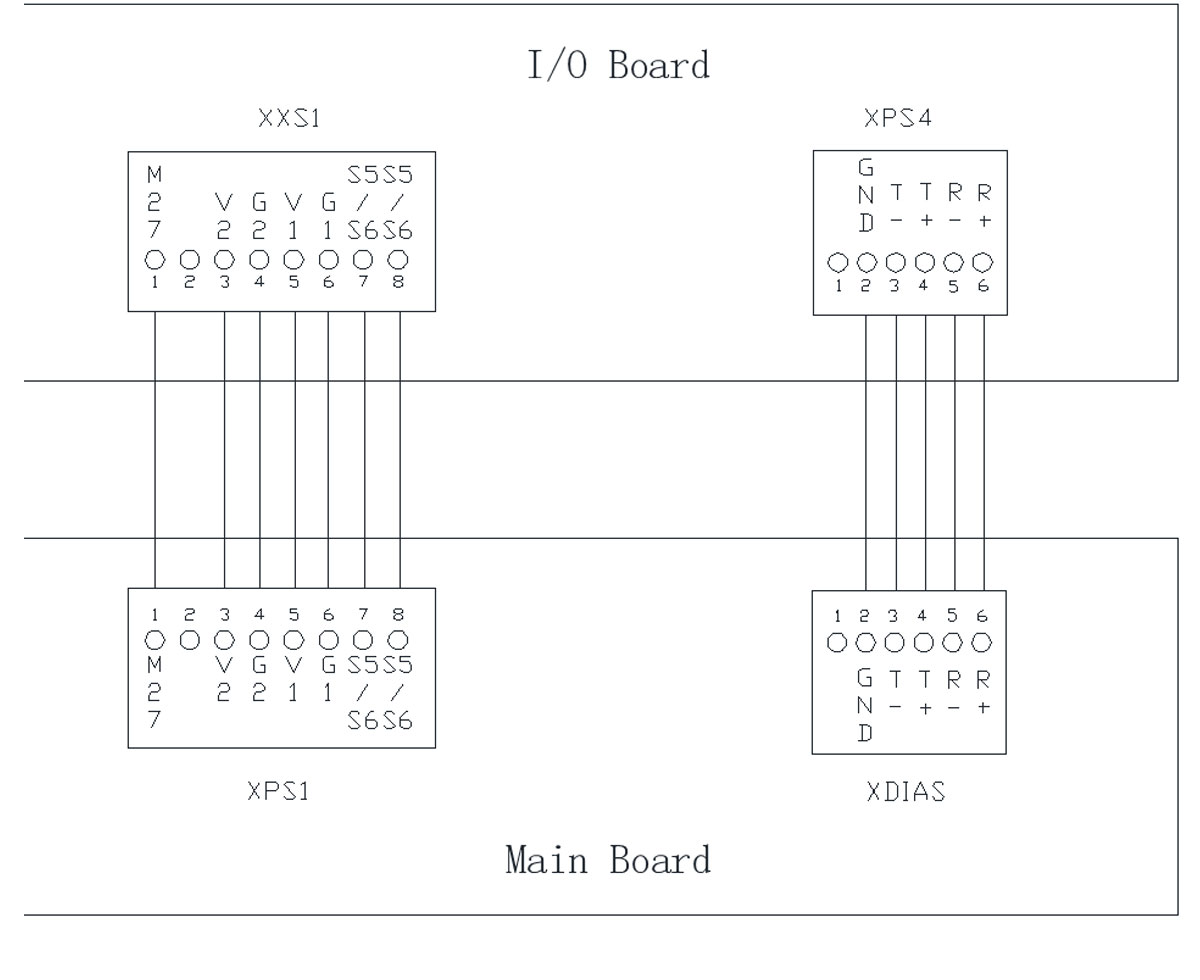
The main board will generate the control signal and distribute them via the I/O board to control the robotic arms to finish the complex automation process.
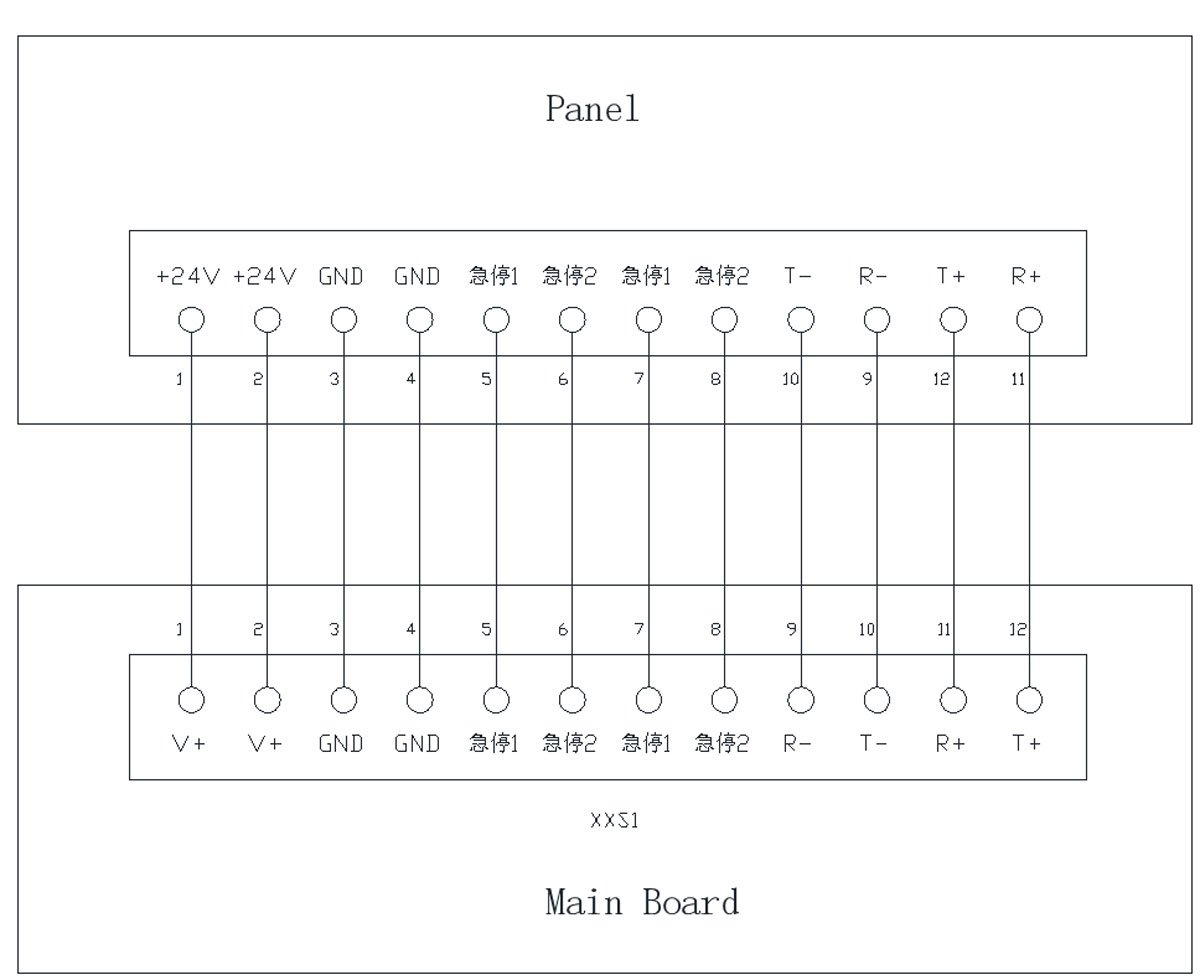
The main board is receiving the operating instruction from the contral panel. This diagram is the wiring instruction for the connecting of the main board and the control panel of the robotic arm.
Please choose position mode for servo system. The command pulse type is forward and reverse pulses. The maximum frequency is 500K.
10.3.1 Connect to Panasonic A6
A6 Servo Settings
| No. | Name | Setting |
|---|---|---|
| Pr0.01 | Control mode | 0 |
| Pr0.05 | Input pulse select | 1 |
| Pr0.06 | Input pulse positive | 0 |
| Pr0.07 | Input pulse mode | 1 |
| Pr0.08 | Pulse of motor circle | 10000 |
| Pr0.11 | Pulse out for circle | 2500 |
| Mainboard | Pansonic A6 | ||||
|---|---|---|---|---|---|
| Pin | Define | Pin | Define | ||
| 1 | P+ | Positive Pulse | 3 | PULS1 | Pulse 1 Input |
| 2 | P- | 4 | PULS2 | ||
| 3 | S+ | Negative Pulse | 5 | SIGN1 | Pulse 2 Input |
| 4 | S- | 6 | SIGN2 | ||
| 5 | A+ | Feedback Pulse Phase A | 21 | OA+ | Phase A Output |
| 6 | A- | 22 | OA- | ||
| 7 | B+ | Feedback Pulse Phase B | 48 | OB- | Phase B Output |
| 8 | B- | 49 | OB- | ||
| 9 | Z+ | Feedback Pulse Phase Z | 23 | OZ+ | Phase Z Output |
| 10 | Z- | 24 | OZ- | ||
| 13 | GND | Signal Ground | 13 | GND | Signal Ground |
| 26 | +24V | +24V Power Supply | 7 | COM+ | External Power + |
| 25 | 0V | Power Ground | 41 | COM- | External Power - |
| 36 | ALM- | Alarm | |||
| 15 | ALARM | Alarm | 37 | ALM+ | |
| 23 | SON | Servo-On | 29 | SRV-ON | Servo-On |
MR-E Servo Settings
| No. | Name | Set |
|---|---|---|
| No.0 | Control Mode | ***0 |
| No.1 | Break Selection | 0012 |
| No.3 | Numerator | 14 |
| No.4 | Denominator | 1 |
| No.21 | Pulse mode select | 0000 |
| No.27 | Pulse out | 14 |
| No.54 | Pulse out | 1*** |
(For 131072 Pulse/Cycle Motor)
| MainBoard | MISUBISHI MR-E | ||||
|---|---|---|---|---|---|
| Pin | Define | Pin | Define | ||
| 1 | P+ | Positive Pulse | 23 | PP | Pulse Input |
| 2 | P- | 22 | PG | ||
| 3 | S+ | Negative Pulse | 25 | NP | Pulse 2 Input |
| 4 | S- | 24 | NG | ||
| 5 | A+ | Feedback Pulse Phase A | 15 | LA | Phase A Output |
| 6 | A- | 16 | LAR | ||
| 7 | B+ | Feedback Pulse Phase B | 17 | LB | Phase B Output |
| 8 | B- | 18 | LBR | ||
| 9 | Z+ | Feedback Pulse Phase Z | 19 | LZ | Phase Z Output |
| 10 | Z- | 20 | LZR | ||
| 13 | GND | Signal Ground | 14 | LG | Logic Ground |
| 26 | +24V | +24V Power Supply | 1 | VIN | DC24V Power+ |
| 25 | 0V | Power Ground | 13 | SG | DC24V Power- |
| 15 | ALARM | Alarm | 9 | ALM | Alarm |
| 23 | SON | Servo-On | 4 | SON | Servo-On |
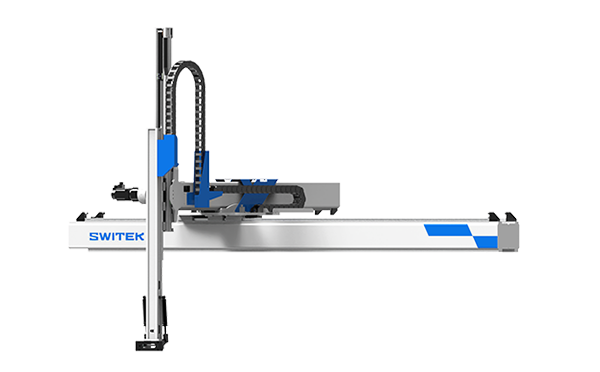
SW7312DS
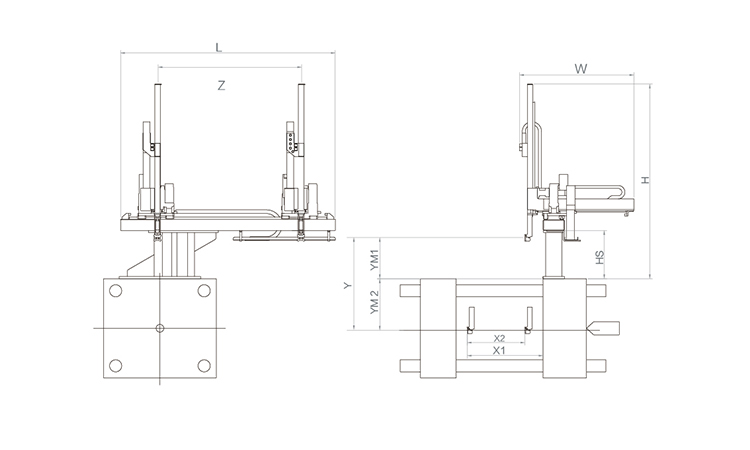
Unit: mm
| X1 | X2 | X3 | X4 | Y | YM1 | YM2 | Z | L | W | H | Payload | 1020 | 730 | 0 | 0 | 1200 | 450 | 750 | 1700 | 2600 | 1660 | 2110 | 5kg |
|---|
EOAT Assembly Demonstration -- One Cavity Car Threshold Strip Picking EOAT
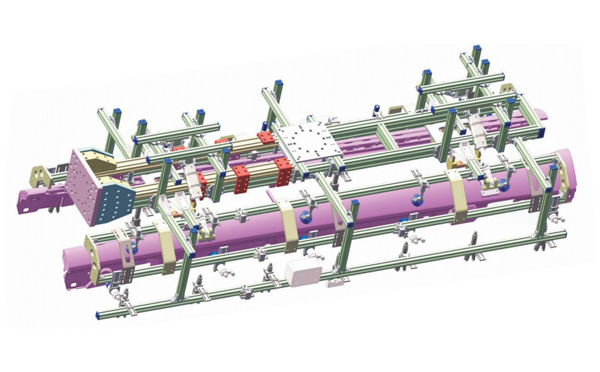
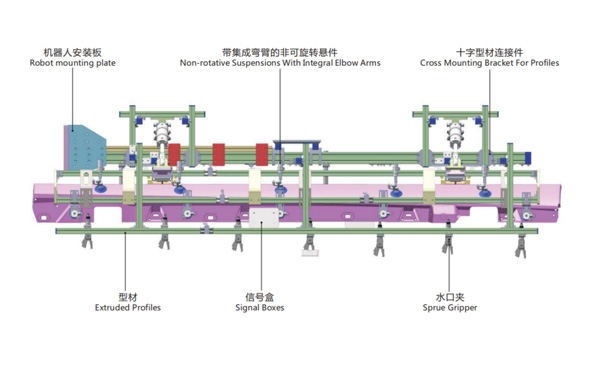
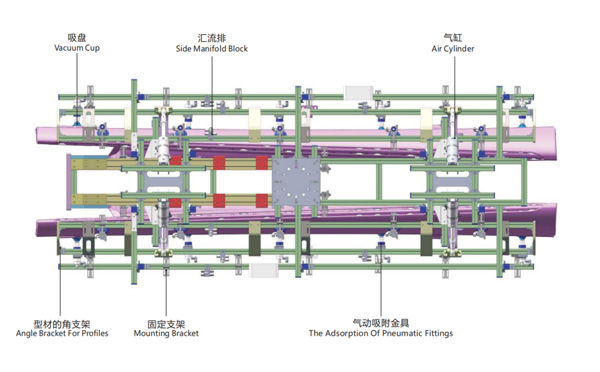
Product Descriptions
Why So Many Cutlery Producers Will Choose a Submarine Gate Cold Runner Mold for Their Cutlery Auto-packing Solutions?
Plastic (PP + CA/PLA) cutlery of different size are widely used around the world with a booming demand of "Takeout" food in a fast-paced life nowadays. And as an easy to produce products more and more plastic factory owners joint this business. But for the new producers of cutlery, how to make your investment rewardable?
To producce a plastic cutlery (Knife, Forks and Spoon) the producer will need an injeciton molding machine, the mold and the automation system. For the automation system it could be a robot only for manually packing or robot + auto-packing system for a cutlery auto-packing system. For the mold the cutlery can either choose a hot runner mold or a cold runner mold. But more and more producer will choose a submarine gate cold runner mold, why?
The most important is the cost advantage of a submarine gate cold runner mold against a hot runner one. As a low value added products most of the cutlery producing system are low budget project, and reduction of the investment means an increase of the profit in the future.
For more ideas about a cutlery auto-packing solution please contact Adams from SWITEK to get a turn-key solution of cutlery packing.