sales06@switek.biz

+86 186 5927 5869

Shopping

Subscrib to Us
sales06@switek.biz
+86 186 5927 5869
Shopping
Subscrib to Us
Keywords:Panasonic A6 Servo Installation Instruction, Panasonic A6 Driver, Panasonic A6 Series Servo Motor Manual
To change the monitor display setting, select the display option to be changed from "
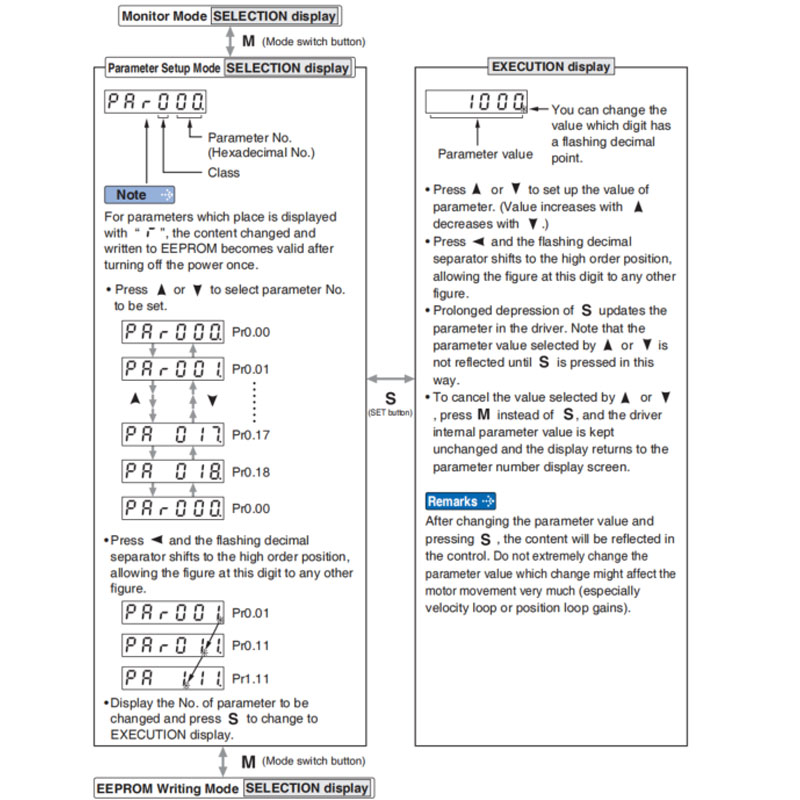
Note → • After setting up parameters, return to SELECT mode, referring to structure of each mode (P.4-42).
• Each parameter has a limit in number of places for upper-shifting.

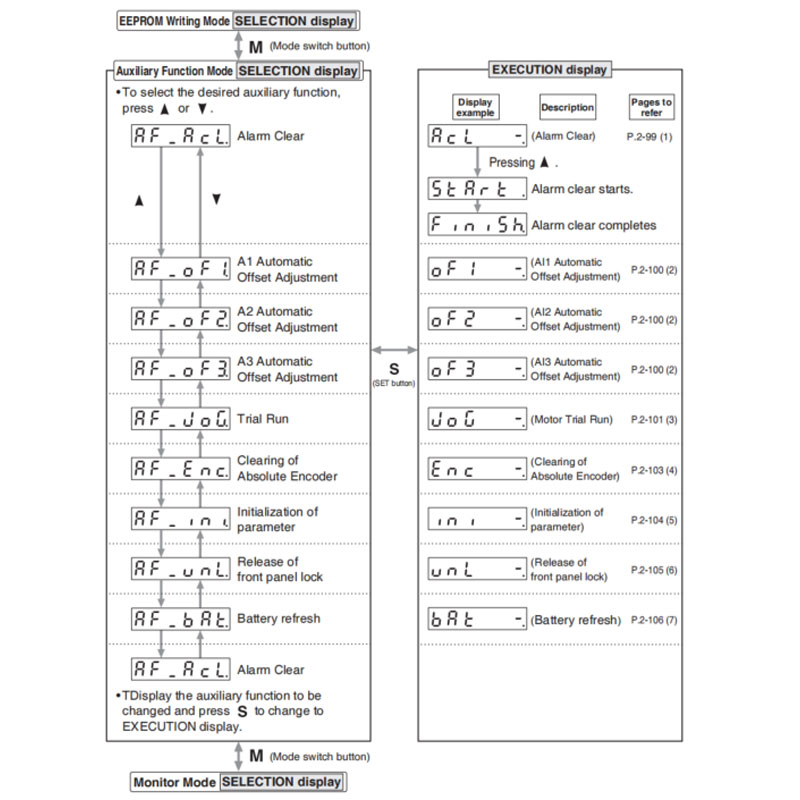
This function releases the current alarm status. Certain alarms will persist. If this is the case, refer to P.6-2 "When in Trouble - Protective Function".
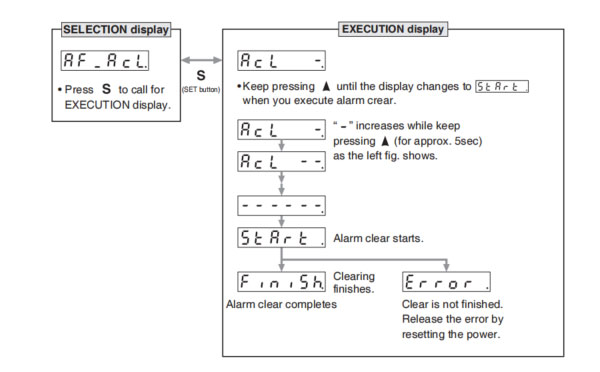
Note → • After alarm cleaning, return to SELECTION display, referring to structure of each mode (P.2-76).
This function automatically ajusts offset setting of analog input.
Analog input 1 (Al1)……Pr4.22 (Analog input 1(Al1) offset setup)
Analog input 2 (Al2)……Pr4.25 (Analog input 2(Al2) offset setup)
Analog input 3 (Al3)……Pr4.28 (Analog input 3(Al3) offset setup)
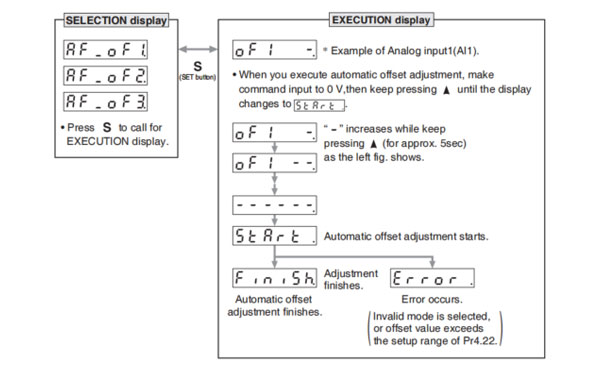
Remarks → • You cannot write the data only by executing automatic offset adjustment. Execute a writing to EEPROM when you need to reflect the result afterward.
Note → • After completion of the automatic offset adjustment, return to SELECTION display by referring to P.2-76 "Structure of Each Mode".
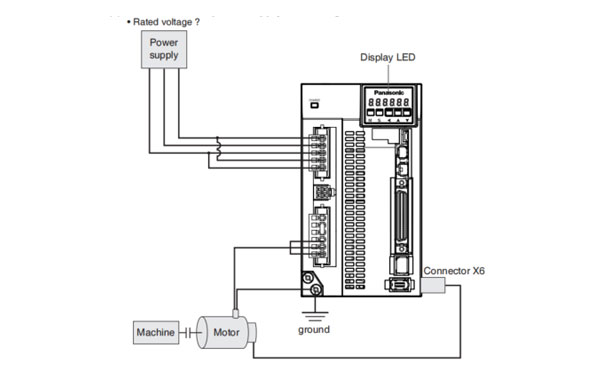
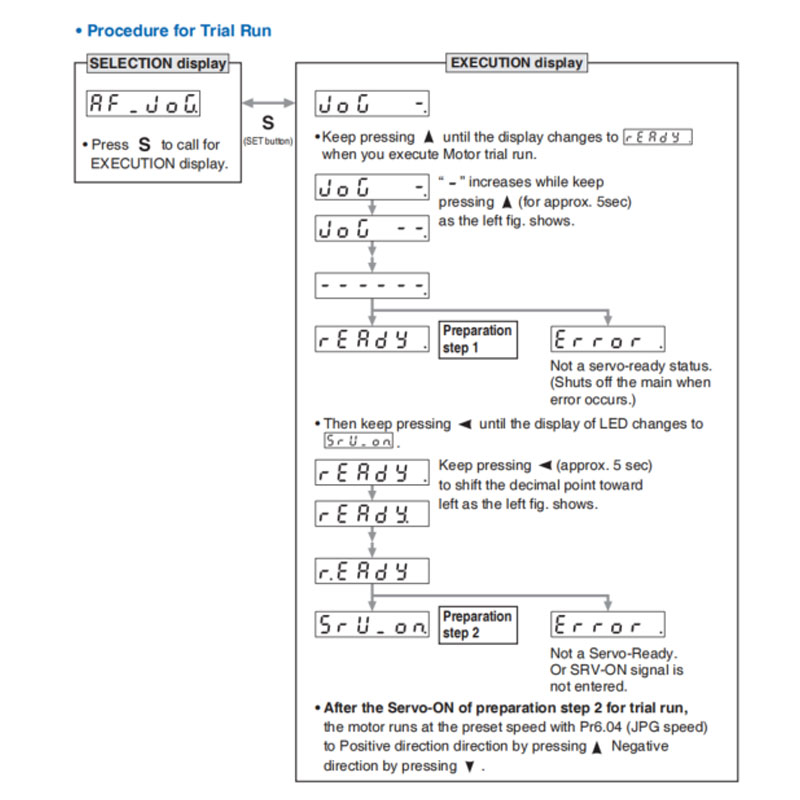
You can make a trial run (JOG run) without connecting the Connector, Connector X4 to the host controller such as PLC.
(1) Inspection on wiring
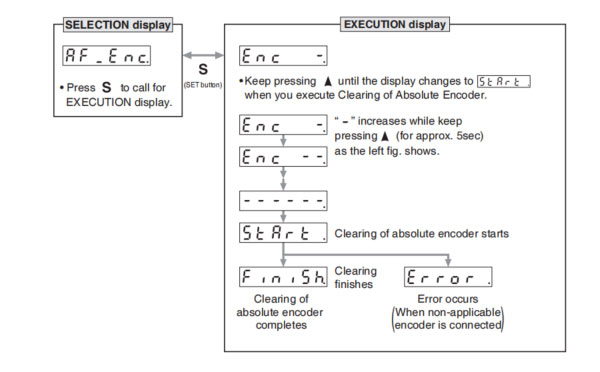
You can clear multi-turn data of the absolute encoder.
Note → • After clearing of absolute encoder finishes, return to SELECTION display, referring to structure of each mode (P.2-76).
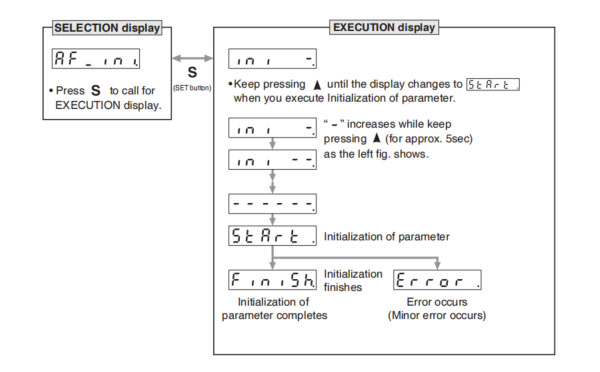
Initialize the parameter.
Release the front panel lock setting.
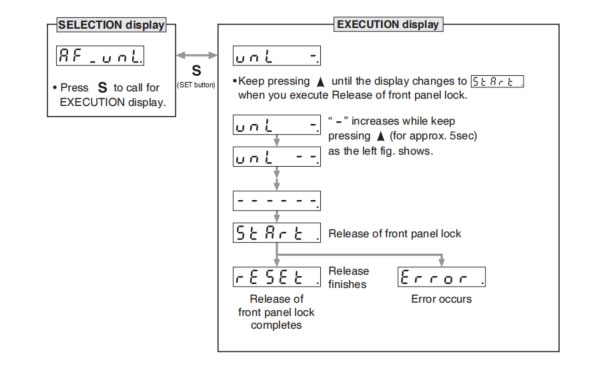
Note → • After release of front panel lock finishes, return to SELECTION display, referring to structure of each mode (P.2-76).
Battery refresh action is conducted.
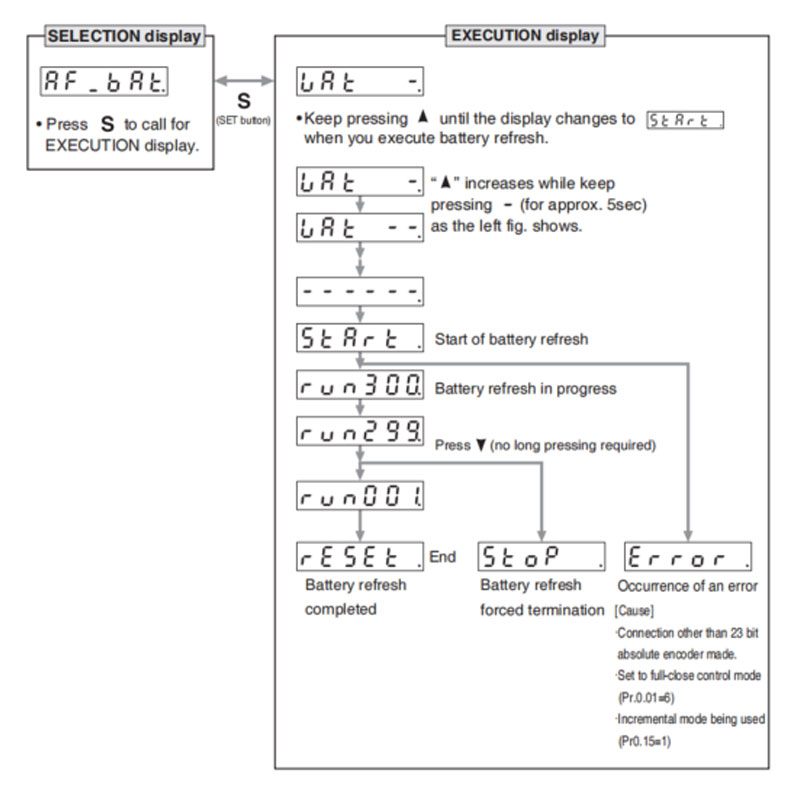
Note 1) When running Battery refresh, Battery alarm may occur in that case, please run the clear Battery alarm.
Note → • After release of front panel lock finishes, return to SELECTION display, referring to structure of each mode (P.2-76).
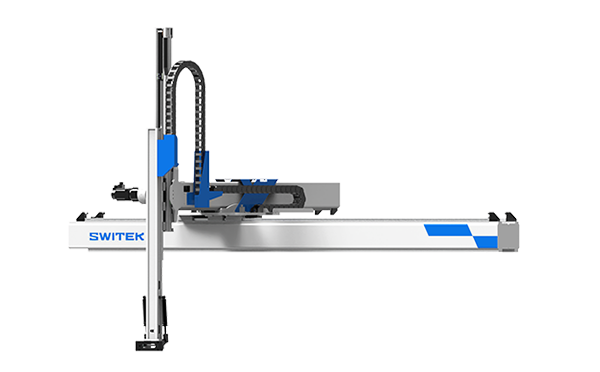
SW7518DS
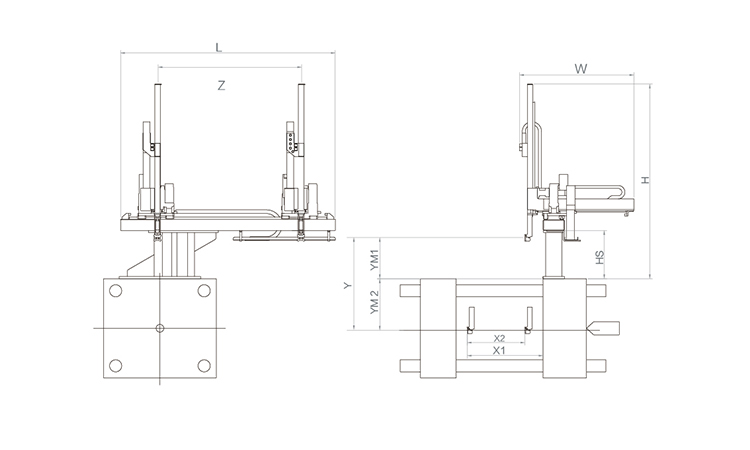
Unit: mm
| X1 | X2 | X3 | X4 | Y | YM1 | YM2 | Z | L | W | H | Payload | 1785 | 1320 | 0 | 0 | 1800 | 500 | 1300 | 3120 | 4160 | 2480 | 2650 | 15kg |
|---|
EOAT Assembly Demonstration -- One Cavity In Mold Insertion EOAT With Mold Positioner
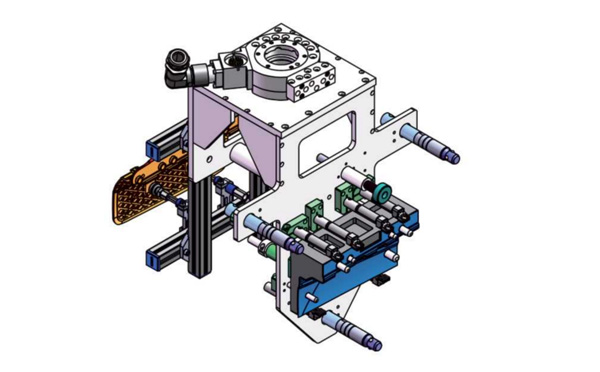
Product Descriptions
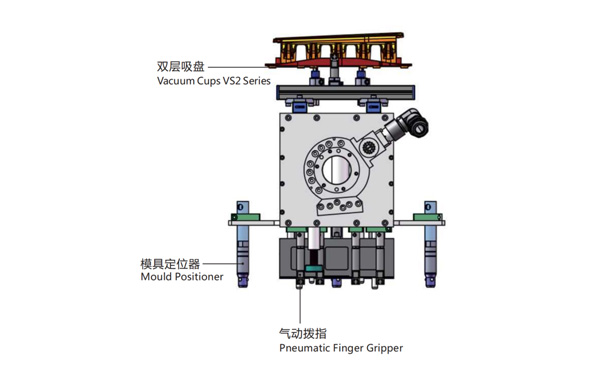
Bom List
| Product Name | PN # | Model | Quantity |
|---|---|---|---|
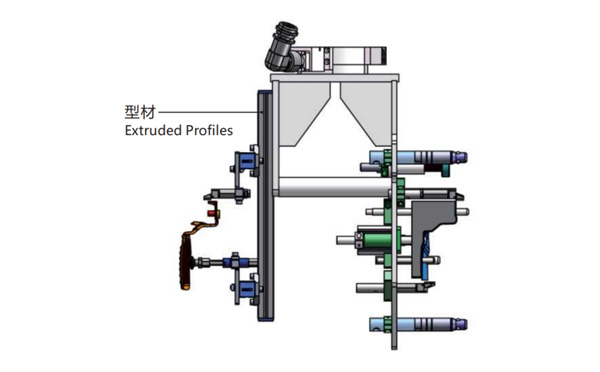
| Extruded Profiles | 4.Y00481 | PEP2525-1500 | 1 |
| Plugs for Profile | 4.Y00070 | PEP2525 | 8 |
| Mould Positioner | 8.Y00088 | GMP20A | 3 |
| Vacuum Cups VS2 Series | 1.Y05310 | VS2-SA20 | 2 |
| Rotative Suspensions | 8.Y00061 | VFR1421-G18 | 2 |
| Pneumatic Finger Gripper | 8.Y00084 | GFR14-95G | 7 |
| Extension Tube | 7.Y00733 | SMBY14-50 | 6 |
| Mounting Bracket | 7.Y00200-T | SMBE1-1440T | 3 |
| Cross Mounting Bracket for Profiles | 7.Y00194-T | SMBA-2525T | 4 |
| Vacuum Cup Fittings | 7.Y00703 | VM02-G18 | 2 |
For Small and Medium Sized IML Container Producer, Is it Possible to Produce More the One Products with the Same IML Robot?
For manay small and medium sized producer of IML containers it many not be easy to make a decision if to accept the order or not because of the small quantity at the beginning but a huge potential in the future. As the IML robot is a custom made system according to the mold design and the injection molding machine for this mold. But is there any possibility to have one IML robot for a couple of molds? The answer is yes.
The SW8 series of side entry IML robot is one of which an ideal choice for the small and medium sized producer of IML containers. With exchangeable magazine and stacking unit, the IML robot enable the IML containers producers to produce the small and medium sized IML containers and IML lids by the injection molding machine and the IML robot with simply to have the magazine and EOAT replaced for the new mold. But with this IML robot, how will the IML containers produce to achieve the maximized productivity?
To maximized the productivity of the IML system, the key would be to have the injection molding machines and the IML robots well organized according to the products. To make the change the magazine and EOATs faster, we can have the containers with wraping labeling produced in one IML system and have the 3/5 face labeling containers and the lids produced by another IML system. It's not recommended to have the containers with wraping labeling to be produced by the same IML system with an IML lids, which will need to change both the Magazine and the stacking unit and the time to start the system up would be much longer.
For more advisory of an IML project planning please feel free to contact Adams from SWITEK Automation, your personal consultant of IML system integration.