sales06@switek.biz

+86 186 5927 5869

Shopping

Subscrib to Us
sales06@switek.biz
+86 186 5927 5869
Shopping
Subscrib to Us

Keywords:PETRI DISH PACKING SYSTEM, PETRI DISH INJECTION MOLDING SOLUTIONS
When one action of the movable parts (Cylinder, servo motor etc. ) finished, one signal would be sent to the next movable parts to enable their action to move the process of petri dish packing moving forward. Here in the "Output Page" the operator of the petri dish packing system will have a just in time notification of the output signals to have a fast diagnose of the working condition of the packing system.
Output Page 1

| No. | Description |
|---|---|
| 1 | Input Page (Input Pg 1) 193 |
| 2 | Input Page (Input Pg 2) 194 |
| 3 | Input Page (Input Pg 3) 195 |
| 4 | Output Page 1 (Output Pg 1) 196 |
| 5 | Output Page 2 (Output Pg 2) 197 |
| 6 | Y00 Main Axis Pulse L318 (Y00 Min Pul) |
| 7 | Y01 Petri Dish Picking Arm Pulse (Y01 Coll Pul) |
| 8 | Y02 Petri Dish Receiving and Lower Flipping Axis Pulse (Y02 Rec Flip Pul) |
| 9 | Y03 Petri Dish Receiving and Upper Flipping Axis Pulse (Y03 Rec Mat Flip Pul) |
| 10 | Y04 Main Axis Direction (Y04 Main Dir) |
| 11 | Y05 Petri Dish Picking Axis Direction |
| 12 | Y06 Petri Dish Receiving and Lower Flipping Axis Direction |
| 13 | Y07 Petri Dish Receiving and Upper Flipping Axis Direction |
| 14 | Y10 Main Arm Clamping Valve (Y10 M Arm Clamp Val) |
| 15 | Y11 Sleeve Borrow Up/Down Cyliner (Y11 Mold Up Cyl) |
| 16 | Y12 Petri Dish Receiving Cylinder 1 (Y12 Rec. Cyl 1) |
| 17 | Y13 Petri Dish Receiving Cylinder 2 (Y13 Rec. Cyl 2) |
| 18 | Y14 Sleeve Borrow Clipping Cylinder (Y14 Clip Mold Cyl) |
| 19 | Y15 Combined Cylinder 1 (Y15 Comb Cyl 1) |
| 20 | Y16 Combined Cylinder 2 (Y16 Comb Cyl 2) |
| 21 | Y17 Top Petri Dish Receiving Cylinder (Y17 Top Rec Cyl) |
| 22 | Y20 Sampling Cylinder (Y20 Insp Cyl) |
| 23 | Y21 Petri Dish Block Cylinder 1 (Y21 Block Cyl 1) |
| 24 | Y22 Petri Dish Block Cylinder 2 (Y22 Block Cyl 2) |
| 25 | Y23 Petri Dish Block Cylinder 3 (Y23 Block Cyl 3) |
| 26 | Y24 Petri Dish Block Cylinder 4 (Y24 Block Cyl 4) |
| 27 | Y25 Sleeve Press Cylinder (Y25 Press Mold Cyl) |
| 28 | Y26 Sleeve Upper Pulling Cylidner (Y26 L Pull Mold Cyl) |
| 29 | Y27 Sleeve Right Pulling Cylinder (Y27 R Clamp Pull Mold Cyl) |
| 30 | Y30 Petri Dish Clamping Cylinder (Y30 Clamp Cyl) |
| 31 | Y31 Sleeve Upper Left Pulling Cylinder (Y31 L Lower Pull Mold Cyl) |
| 32 | Y32 Upper Left Clamping/Push Cylinder (Y32 Lower Push Cyl) |
| 33 | Y33 Upper Right Sleeve Pulling Cylinder (Y33 R Lower Pull Mold Cyl) |
| 34 | Y34 Lower Right Clamping/Push Cylinder (Y34 R Lower Push Cyl) |
| 35 | Y35 Top Sleeve Opening Cylinder L347 (Y35 Top Mold Open Cyl) |
| 36 | Auto Mode (Auto) |
| 37 | Manual Mode (Manual) |
| 38 | System Parameters (Sys Params) |
| 39 | Position Setting (Pos Set) |
| 40 | Position Interface (Pos Interface) |
| 41 | Alarm interfaces |
| 42 | I/O Monitor (I/O Mon) |
Output Page 2

| No. | Description |
|---|---|
| 1 | Input Page 1 (Input Pg) 193 |
| 2 | Input Page 2 (Input Pg) 194 |
| 3 | Input Page 3 (Input Pg) 195 |
| 4 | Output Page 1 (Output Pg) 196 |
| 5 | Output Page 2 (Output Pg) 197 |
| 6 | Y74 Petri Dish Lift Direction (Y74 Mat Lift Dir) |
| 7 | Y75 Sleeve Pulling Axis Direction (Y75 Pull Mold Dir) |
| 8 | Y76 Lower Left Sleeve Pulling Cylinder (Y76 L Pull Mold Cyl) |
| 9 | Y77 Lower Left Sleeve Pushing Cylinder (Y77 L Lower Pull Mold Cyl) |
| 10 | Y100 Mark Printing Pulse (Y100 Mark Pul) |
| 11 | Y101 Packed Petri Dish Collecting Axis Pulse (Y101 Rec Pul) |
| 12 | Y102 Ppot Check Lamp |
| 13 | Y103 Alarm Buzzer |
| 14 | Y104 Mark Printing Axis Pulse (Y104 Mark Pul) |
| 15 | Y105 Packed Petri Dish Collecting Axis Pulse (Y105 Rec Pul) |
| 16 | Y106 Petri Dish Block Up Cylinder 3 (Y106 Block Up Cyl 3) |
| 17 | Y107 Petri Dish Block Up Cylinder 4 (Y107 Block Up Cyl 4) |
| 18 | Y110 Reserved (Y110 Spare) |
| 19 | Y111 Reserved (Y111 Spare) |
| 20 | Y112 Reserved (Y112 Spare) |
| 21 | Auto Mode (Auto) |
| 22 | Manual Mode (Manual) |
| 23 | System Parameters (Sys Params) |
| 24 | Position Setting (Pos Set) |
| 25 | Position Interface (Pos Interface) |
| 26 | Alarm Interface |
| 27 | I/O Monitor (I/O Mon) |

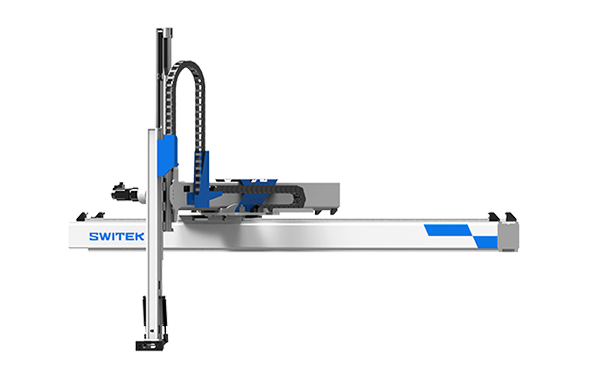
SW6710S
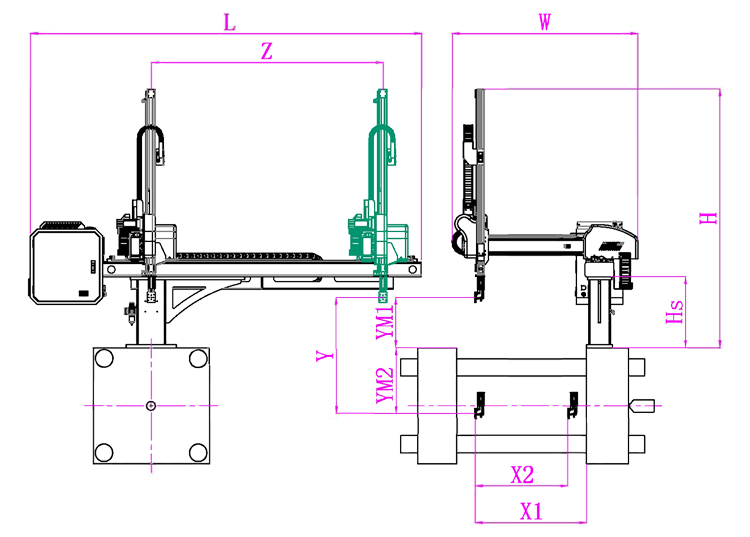
Unit: mm
| X1 | X2 | X3 | X4 | Y | YM1 | YM2 | Z | L | W | H | Payload | 900 | 750 | 0 | 0 | 1000 | 420 | 580 | 1750 | 2780 | 1610 | 1930 | 8kg |
|---|
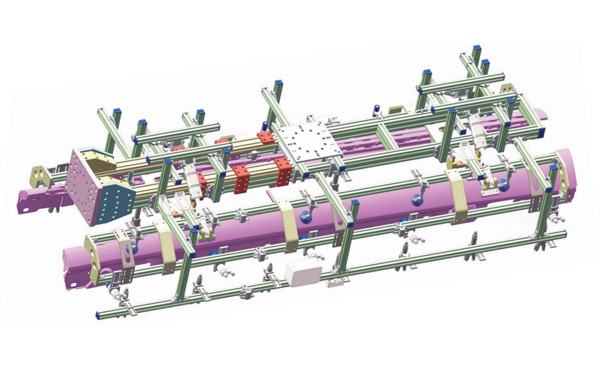
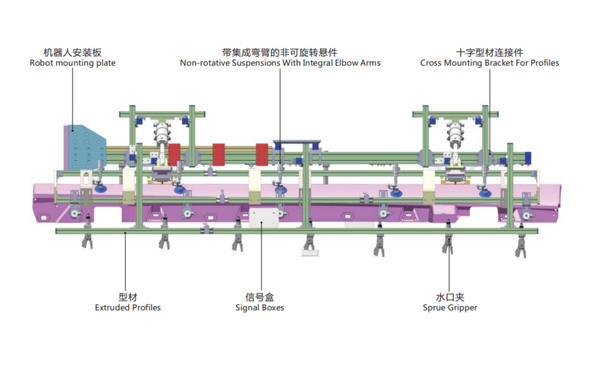
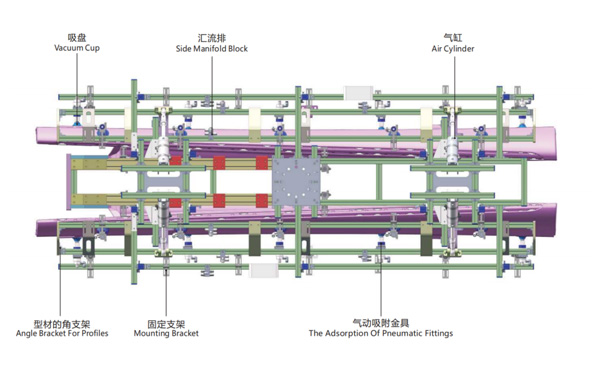
EOAT Assembly Demonstration -- One Cavity Car Threshold Strip Picking EOAT
Product Descriptions
What Would be the Best Picking Robot for LK FA1200 in a Dustbin Production Project?
FA1200 is a Two-palten energy-saving servo injection molding machine produced by LK machinery for the production of automotive parts, home appliances, sanitation buckets, pallets, pipe fittings etc. As a Two-platen injection molding machine, it's an ideal choice for the production of deep cavity container like dustbin. For a project of dustbin production, which robot would be the best for this injection molding machine?
As a Two-platen injection molding machine with a clamping force of 12000kN, LK FORZA FA1200 has an opening stroke of 2100mm with a max mold thickness up to 1300mm, it'll be suitable to produce a dustbin with a maximum height up to 650mm without IML. To pick the dustbin only the 3 axis servo injection robot SW7518DS by SWITEK Automation would be the best one.
SW7518DS is a medium sized 3 axis servo injection robot designed for the injection molding machine with clamping force from 500T ~ 1500T with a payload up to 15kg. As a kick-back designed robot, it'll provide 30% more space for EOAT moving and a perfect mate to a deep cavity product like dustbin picking.
Starting from 2006, SWITEK is providing the OEM/ODM service of robotic arms for injection automation from Sprue picker to heavy duty robot with payload up to 75kg to match injection molding machine up to 4000T with turn-key injection automation solutions. For more information about SWITEK robotic arms and injection automation solution please contact Adams, your personal consultant of injecdtion automation solution integration.