
sales06@switek.biz

+86 186 5927 5869

Shopping

Subscrib to Us
sales06@switek.biz
+86 186 5927 5869
Shopping
Subscrib to Us
Keywords:PETRI DISH PACKING SYSTEM, PETRI DISH INJECTION MOLDING SOLUTIONS
The delay setting of the SWITEK side entry Petri Dish packing system is to set the delay time of each action to ensure the safety but without sacrifice the efficiency of the petri dish packing system. Here in this chapter we'll introduce the meaning of the terms in the delay setting pages to help the operator of the packing system to keep it working efficiently and safely.
Delay Setting 1
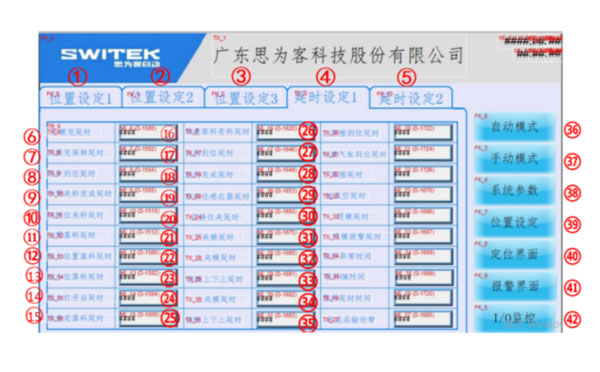
| No. | Description |
|---|---|
| 1 | Position Setting 1 (Pos Set 1) 400 |
| 2 | Position Setting 2 (Pos Set 2) 401 |
| 3 | Position Setting 3 (Pos Set 3) 402 |
| 4 | Delay Setting 1 (Delay Set 1) 403 |
| 5 | Delay Setting 2 (Delay Set 2) 404 |
| 6 | Mold Open Finished Delay (Mold Open Del) 484 |
| 7 | Mold Closed Holding Delay (Mold Close Hold Del) 485 |
| 8 | Ejector Arrived the Position Delay (Ej Arr Del) 486 |
| 9 | The robot arm petri dish calmping finish delay (Arm Clamp Cmpl Del) 487 |
| 10 | Petri Dish Transfer Clampping Delay (Trans Clamp Del) 488 |
| 11 | Main Arm Petri Dish Dropping Delay (M Arm Drop Del) 489 |
| 12 | Petri Dish Assembly Position Dropping Delay (Comb Mat. Drop Del) 490 |
| 13 | Assembled Petri Dish Dropping Delay (Comb Mat Drop Del) 491 |
| 14 | Assembly Unit Opened Delay (Stack Cmpl Mat Drop Del) 492 |
| 15 | Stacked Petri Dish Dropping Finished Delay (Stack Cmpl Mat Drop Del) 493 |
| 16 | Stacked Petri Dish Picking Delay (Conv Belt Del) 494 |
| 17 | Petri Dish Clamping Arrived Delay (Clamp Mat Arr Del) 495 |
| 18 | Petri Dish Releasing Finished Delay (Mat Rel Cmp Del) 496 |
| 19 | Petri Dish Picking Position Sensor Delay (Mat Picking Delay) 589 |
| 20 | Exchange Position Clamping Delay (Exchange Delay) 590 |
| 21 | Lower Sleeve Clip Delay (L Mold Clamp Delay) 591 |
| 22 | Upper Sleeve Clip Delay (Up Mold Clamp Delay) 592 |
| 23 | Borrow Sleeve Up/Down Up Delay (Borrow Up Delay) 593 |
| 24 | Up Sleeve Clip Delay (Up Mold Clamp Delay) 592 |
| 25 | Borrow Sleeve Up/Donw Up Delay (Borrow Up Delay) 593 |
| 26 | Upper Sleeve Welding Done Delay (Weld Arr Del) 498 |
| 27 | Sleeve Cutting Cylinder Arrived Delay (Cut Mold Cyl Arr Del) 499 |
| 28 | Down Sleeve Welding Done Delay (Low Weld Del) 500 |
| 29 | Vacuum Delay (Vac Extra Delay) 596 |
| 30 | Sleeve Suction Delay (Mold Suction Delay) 597 |
| 31 | Sleeve Suction Alarm Delay (Mold Suction Alarm Delay) 598 |
| 32 | Petri Dish Picking Error Time (Picker Error T) 700 |
| 33 | Petri Dish Picking Ok Time (Picker OK T) 701 |
| 34 | Petri Dish Dropping Delay Time (Mat Drop Del) 497 |
| 35 | Finished Parts Collecting Conveyor (Conveyor) 588 |
| 36 | Auto Mode (Auto) |
| 37 | Manual Mode (Manual) |
| 38 | System Parameters (Sys Params) |
| 39 | Position Setting (Pos Set) |
| 40 | Position Interface (Pos Interface) |
| 41 | Alarm Interface |
| 42 | I/O Monitor (I/O Mon) |
Delay Setting 2
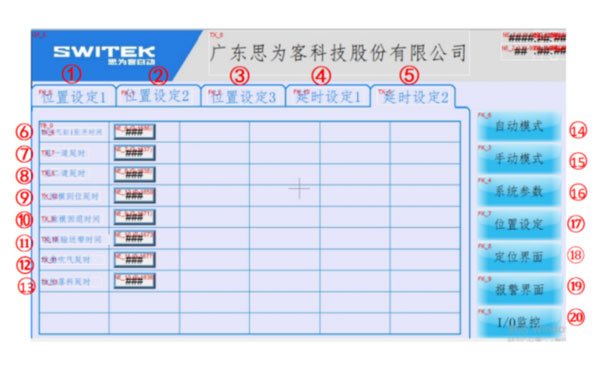
| No. | Description |
|---|---|
| 1 | Position Setting (Pos Set 1) 400 |
| 2 | Position Setting (Pos Set 2) 401 |
| 3 | Position Setting (Pos Set 3) 402 |
| 4 | Delay Setting (Delay Set 1) 403 |
| 5 | Delay Setting (Delay Set 2) 404 |
| 6 | Petri Dish Receiving Cylinder Open Time (Jig Cyl 1 Op Delay) 696 |
| 7 | Gate 1 Delay 697 |
| 8 | Gate 2 Delay 698 |
| 9 | Up Lifting Cylinder Arrived Delay (Upp M Cyl ON) 745 |
| 10 | Up Lifting Cylinder Retreat Delay (Upp M Cyl Delay) 710 |
| 11 | Mold Conveyor Belt 711 |
| 12 | Stacking Blow Delay 733 |
| 13 | Sampling Petri Dish Dropping Delay (Blanking Mate Time) 750 |
| 14 | Auto Mode (Auto) |
| 15 | Manual Mode (Manual) |
| 16 | System Parameters (Sys Params) |
| 17 | Position Setting (Pos Set) |
| 18 | Position Interface (Pos Interface) |
| 19 | Alarm interfaces |
| 20 | I/O Monitor (I/O Mon) |
REMARKS:
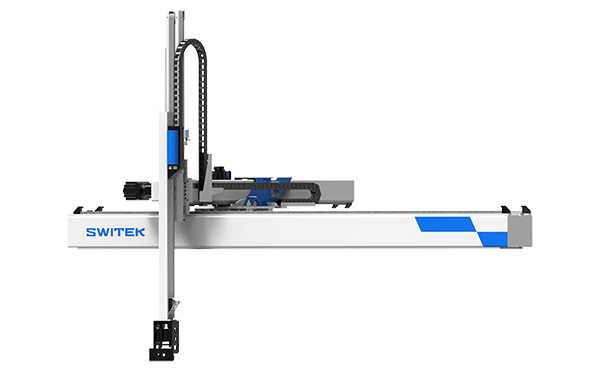
SW7730DS
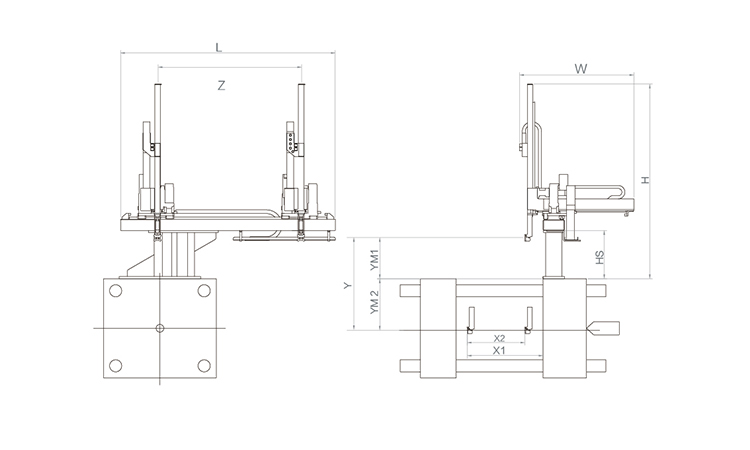
Unit: mm
| X1 | X2 | X3 | X4 | Y | YM1 | YM2 | Z | L | W | H | Payload | 2250 | 1720 | 0 | 0 | 3000 | 780 | 2220 | 4000 | 5050 | 3005 | 3440 | 75kg |
|---|
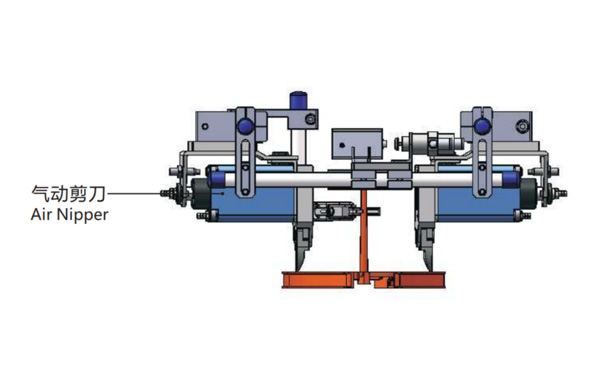
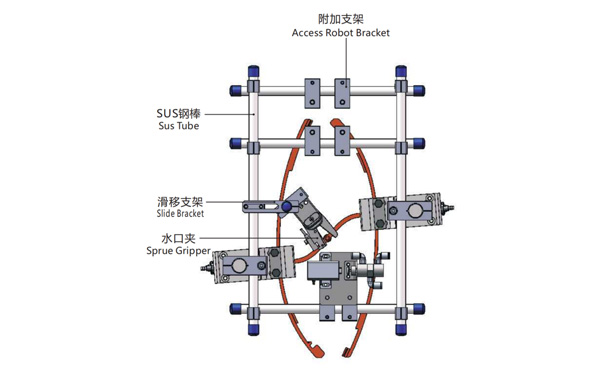
EOAT Assembly Demonstration -- Two Cavities Parts Picking EOAT with Runner Cutting by Air Nipper
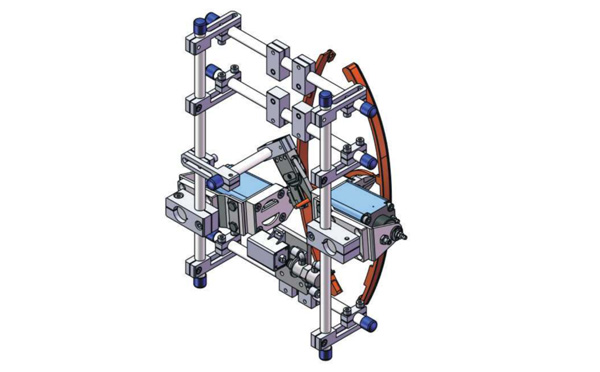
Product Descriptions
Bom List
| Product Name | PN # | Model | Quantity |
|---|---|---|---|
| Sus Tube | 4.Y00021 | PST12-1500 | 2 |
| Air Nipper | 1.Y00004 | GT-NY25 | 2 |
| Straight Blades for Plastic | 1.Y00037 | NY25AJ | 2 |
| Fixing Block | 7.Y00633 | SCE2-25 | 2 |
| Tube Plugs | 1.Y03638 | PST12-1500 | 11 |
| Cross Connector | 7.Y00027 | SMBT-2012 | 2 |
| Access Robot Bracket | 7.Y00002 | SMBH1-12M6 | 6 |
| L-Type Thread Hose Fitting | 1.Y02809 | APL6-M5 | 3 |
| Slide Bracket | 7.Y00004 | SCF4-1240W16 | 7 |
| Slide Bracket | 7.Y00001 | SMBS-12T16 | 7 |
| Sprue Gripper | 8.Y00091 | GR12-12-CN | 1 |
| Cross Connector | 7.Y00020 | SMBT-1212 | 1 |
For vision control system for IML containers, what's the advantages and disadvantages of the open type of vision control system?
Vision control is now a very important in IML system especially the IML solutions for dairy products packages like yogurt cups, butter cups etc. For most European IML solutions providers like BRINK that they'll choose an open type of Vision control system which will check if the containers are well labeled or not immediately after the containers picked out from the mold and have them re-stacked after the vision control. This kind of solution will help to increase the efficiency of the IML System and pick out the defect parts quickly.
But, for some minor defect like dirt it would be impossible to be checked out because the precision of the cameras would be influenced by the changing light of the environment. To solve this problem the updated solution would be to have the IML containers checked in a closed light box which will creat a stable environment to the camera to minimize the misjudgement of the good and non good parts. -- SWITEK Yogurt Cups Vision Control Solution


