sales06@switek.biz

+86 186 5927 5869

Shopping

Subscrib to Us
sales06@switek.biz
+86 186 5927 5869
Shopping
Subscrib to Us
Keywords:Panasonic A6 Servo Installation Instruction, Panasonic A6 Driver, Panasonic A6 Series Servo Motor Manual
The correct setup of the parameter and mode of the Panasonic A6 series of servo will ensure the proper working of the Panasonic A6 series of motor and the stability of your machineries and automation system.
| Parameter No. | Title | Range | Default | Unit | Turning on of power supply | Related Control Mode | Detail page | ||||||
|---|---|---|---|---|---|---|---|---|---|---|---|---|---|
| Class | No. | A, B-frame | C-frame | D,E,F-frame | P | S | T | F | |||||
| 8 | 00 | For manufacturer's use | — | 0 | — | 4-84 | |||||||
| 8 | 01 | For manufacturer's use | — | 100 | — | ||||||||
| 8 | 02 | For manufacturer's use | — | 0 | — | ||||||||
| 8 | 03 | For manufacturer's use | — | 0 | — | ||||||||
| 8 | 04 | For manufacturer's use | — | 100 | — | ||||||||
| 8 | 05 | For manufacturer's use | — | 0 | — | ||||||||
| 8 | 10 | For manufacturer's use | — | 0 | — | ||||||||
| 8 | 12 | For manufacturer's use | — | 0 | — | ||||||||
| 8 | 13 | For manufacturer's use | — | 0 | — | ||||||||
| 8 | 14 | For manufacturer's use | — | 0 | — | ||||||||
| 8 | 15 | For manufacturer's use | — | 0 | — | ||||||||
| 8 | 19 | For manufacturer's use | — | 0 | — | ||||||||
| Parameter No. | Title | Range | Default | Unit | Turning on of power supply | Related Control Mode | Detail page | ||||||
|---|---|---|---|---|---|---|---|---|---|---|---|---|---|
| Class | No. | A, B-frame | C-frame | D,E,F-frame | P | S | T | F | |||||
| 9 | 00 | For manufacturer's use | — | 0 | — | 4-84 | |||||||
| 9 | 01 | For manufacturer's use | — | 0 | — | ||||||||
| 9 | 02 | For manufacturer's use | — | 0 | — | ||||||||
| 9 | 03 | For manufacturer's use | — | 1000 | — | ||||||||
| 9 | 04 | For manufacturer's use | — | 0 | — | ||||||||
| 9 | 05 | For manufacturer's use | — | 0 | — | ||||||||
| 9 | 06 | For manufacturer's use | — | 0 | — | ||||||||
| 9 | 07 | For manufacturer's use | — | 0 | — | ||||||||
| 9 | 08 | For manufacturer's use | — | 0 | — | ||||||||
| 9 | 09 | For manufacturer's use | — | 0 | — | ||||||||
| 9 | 10 | For manufacturer's use | — | 0 | — | ||||||||
| 9 | 11 | For manufacturer's use | — | 1 | — | ||||||||
| 9 | 12 | For manufacturer's use | — | 80 | — | ||||||||
| 9 | 13 | For manufacturer's use | — | 50 | — | ||||||||
| 9 | 14 | For manufacturer's use | — | 10 | — | ||||||||
Caution → The symbol "*" attached to "Unit". indicates that the digits of setting unit will change if the parameter is set by using the setup support software PANATERM.
Note → Parameter describes of this page is P.4-6 to P.4-85.

SW6310-20
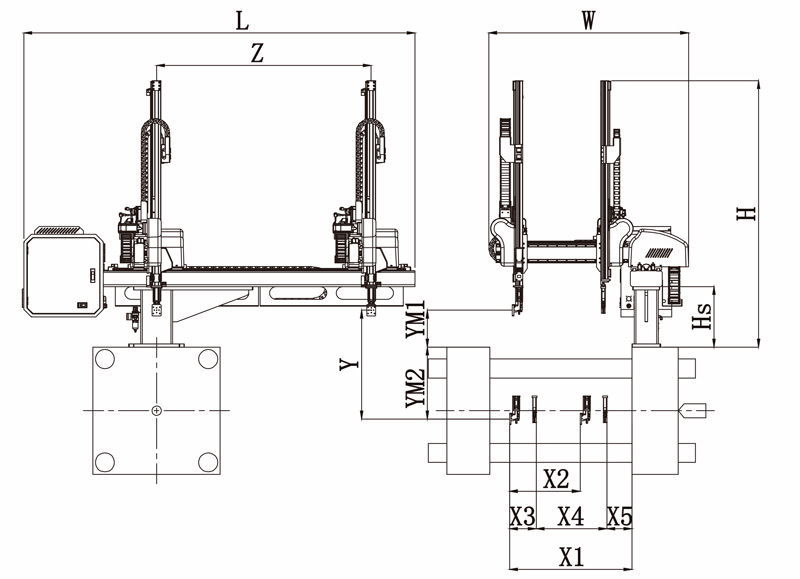
Unit: mm
| X1 | X2 | X3 | X4 | Y | YM1 | YM2 | Z | L | W | H | Payload | 980 | 640 | 165 | 645 | 1000 | 235 | 765 | 1700 | 2640 | 1500 | 1930 | 3kg |
|---|
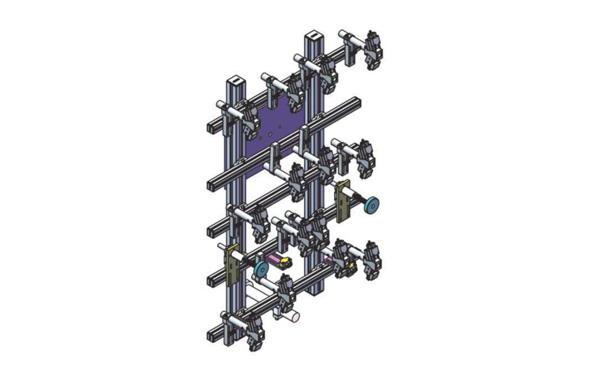
EOAT Assembly Demonstration -- Two Cavities Non-woven Fabric In Mold Insertion
Product Descriptions
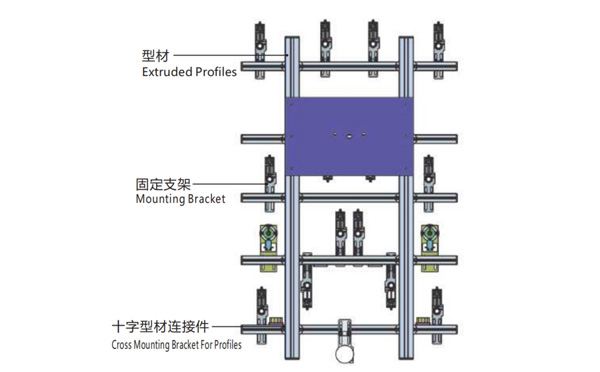
Bom List
| Product Name | PN # | Model | Quantity |
|---|---|---|---|
| Extruded Profiles | 4.Y00052 | PEP4040-1000 | 2 |
| Plugs for Profile | 4.Y00072 | PEP4040 | 4 |
| Extruded Profiles | 4.Y000481 | PEP2525-1500 | 2 |
| Extruded Profiles | 4.Y00481 | PEP2525-1000 | 1 |
| Plugs for Profile | 4.Y00070 | PEP2525 | 10 |
| Cross Mounting Bracket for Profiles | 7.Y00356-T | SMBA-2540T | 10 |
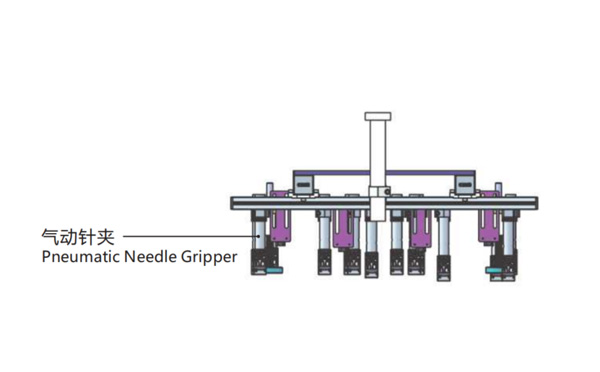
| Pneumatic Needle Gripper | 8.Y00025 | GN2010 | 14 |
| Mounting Bracket | 7.Y00308-T | SMBE2-2060T | 14 |
| Mounting Bracket | 7.Y00309-T | SMBE2-3060T | 1 |
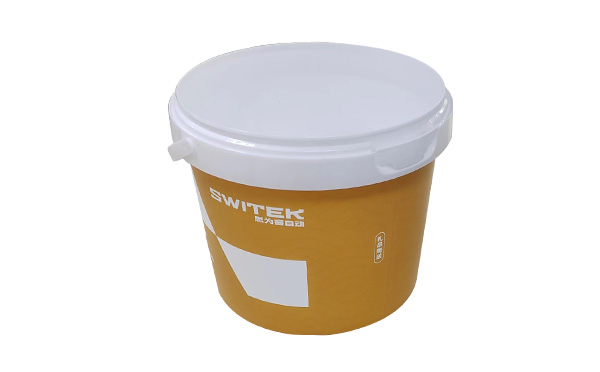
What's Would be the Most Economic Way to Produce An IML Bucket With Handle?
As one of the most popular food package in the market, an IML pail with handle is in demand of huge quantity but the assembly of the handle make it a labour entensive products. Is there any solutions that will make the production of an IML bucket with handle automatically? The answer would definitely yes.
One of the most economic way would be to have the pails and handle integrated into one single mold, it could be 2 + 2 or 4 + 4 design which the IML robot will pick the buckets and have the handles assembled automatically. With this solution, the IML buckets producer will only need one set of IML system to have the buckets and handle produced and assembled immediately.
> It sounds great right, but what would be the productivity of such a system? In Chinaplas 2024 SWITEK cooperated with YIZUMI onshowed a 2 + 2 IML solution of 1L pails at the cycle time of around 7.5s. Generally the performance of the injection molding machine, the mold and the IML robot are all very important to make it a perfect IML system with handle assembly.
Fore more questions about your IML projects, please feel free to contact Adams from SWITEK, your personal consultant of IML technology.